nervous
Well-known member
One of my favorite features of my Luke 3 was the onboard push/push boost option. Had never had the before and found it very useful playing live. So I set off to find a similar option for my Axis Sport(s) and came upon the BECOS FX Micro Booster MK4 Onboard Guitar Preamp with Push-Push Switch-Pot, uBST4 (w/ 500k pot in my dual humbucker application).
Micro Booster MK4 Onboard Guitar Preamp with Push-Push Switch-Pot
They indicate that they are normally available in the USA from Guitar Hero but because of parts shortages, namely the 500k pot/switch, they remain unavailable.
BECOS FX Micro Booster MK4 Onboard Guitar Preamp with Push-Push Switch-Pot, 250K (for Single Coil)
In my searching and research there are limited discussions on this forum of the item but info is generally scarce. I started chatting with the company a few months ago and with no other equivalent options available I decided to wait it out. They recently became available again so I direct ordered one from the mfg in Austria. My experience with them from the start has been exceptional, very communicative with fast, detailed responses and very helpful overall. And very patient with a hack like me. From order to international delivery I was kept informed of every step of the build and shipping process. Very professional.
This is the unit:
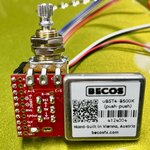
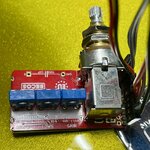
And the connectors:
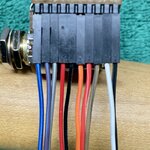
I really had no idea about the size, fit, wiring, etc but decided to give it a try. First thing I notice is the unit is a bit bigger than I expected, not a lot but enough to initially give me concerns about fitting it into the control cavity. Second were the large "EMG" style pin and socket connectors, which I have a love/hate relationship with. And in this case that was the same. They are long and spindly with pretty limited grip so while they connect fine when stationary they are very fiddly and like to slide apart when being moved. So during installation when wrangling a multitude of various wires, many with delicate and tenuous connections already, it's just an added degree of frustration.
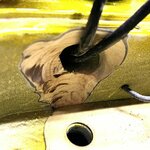
During the initial dry fit I immediately discovered there are two install options. 1) as you will see my final choice, or 2) turned the opposite direction with the label side parallel with the selector/super switch. Both present challenges in wire routing due to the size of the aforementioned pin connectors. In my selected position the pot hole is just a bit too close to the cavity wall for the booster to slide in at the correct 90* angle. So that required some wood removal in that area to allow sufficient space. A bit tricky with the pickup wiring in place but I had no desire to do a full disassembly to do this work.
I know that it's not the prettiest woodworking effort but this is the result:
And the fit.
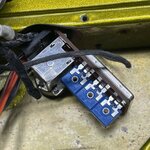
The wires, as expected, are fine, tricky to strip and solder, much like the pickup wires. I liken this type of wire to soldering hair. Just a generally unhappy experience for me every time. And if you don't immobilize them before moving on those new connections do not tolerate or survive very much repeated motion or flexing before failing. This one fought me on many fronts. I did as much pre-installation testing off the guitar to insure I had my connection plan sorted but even then my first try into the guitar yielded me an always on volume control. After more testing the second try, with some substantial disconnecting, rewiring and coaxing the entire bundle of uncooperative connections into something sensible, I had a successful installation. I was also able to splice in my usual treble bleed.
This is the result:
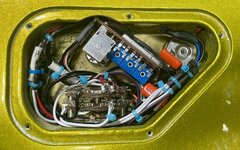
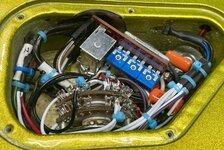
I'll report back after I tweak the internals to my liking and test on a couple jobs. The unit offers up to 25db of onboard boost, and has onboard boost or cut bass and treble controls that are zeroed at 12 o'clock and it's true bypass, not battery dependent with the boost circuit disengaged which is a nice peace of mind. I am optimistic.
Micro Booster MK4 Onboard Guitar Preamp with Push-Push Switch-Pot
They indicate that they are normally available in the USA from Guitar Hero but because of parts shortages, namely the 500k pot/switch, they remain unavailable.
BECOS FX Micro Booster MK4 Onboard Guitar Preamp with Push-Push Switch-Pot, 250K (for Single Coil)
In my searching and research there are limited discussions on this forum of the item but info is generally scarce. I started chatting with the company a few months ago and with no other equivalent options available I decided to wait it out. They recently became available again so I direct ordered one from the mfg in Austria. My experience with them from the start has been exceptional, very communicative with fast, detailed responses and very helpful overall. And very patient with a hack like me. From order to international delivery I was kept informed of every step of the build and shipping process. Very professional.
This is the unit:


And the connectors:

I really had no idea about the size, fit, wiring, etc but decided to give it a try. First thing I notice is the unit is a bit bigger than I expected, not a lot but enough to initially give me concerns about fitting it into the control cavity. Second were the large "EMG" style pin and socket connectors, which I have a love/hate relationship with. And in this case that was the same. They are long and spindly with pretty limited grip so while they connect fine when stationary they are very fiddly and like to slide apart when being moved. So during installation when wrangling a multitude of various wires, many with delicate and tenuous connections already, it's just an added degree of frustration.
During the initial dry fit I immediately discovered there are two install options. 1) as you will see my final choice, or 2) turned the opposite direction with the label side parallel with the selector/super switch. Both present challenges in wire routing due to the size of the aforementioned pin connectors. In my selected position the pot hole is just a bit too close to the cavity wall for the booster to slide in at the correct 90* angle. So that required some wood removal in that area to allow sufficient space. A bit tricky with the pickup wiring in place but I had no desire to do a full disassembly to do this work.
I know that it's not the prettiest woodworking effort but this is the result:

And the fit.

The wires, as expected, are fine, tricky to strip and solder, much like the pickup wires. I liken this type of wire to soldering hair. Just a generally unhappy experience for me every time. And if you don't immobilize them before moving on those new connections do not tolerate or survive very much repeated motion or flexing before failing. This one fought me on many fronts. I did as much pre-installation testing off the guitar to insure I had my connection plan sorted but even then my first try into the guitar yielded me an always on volume control. After more testing the second try, with some substantial disconnecting, rewiring and coaxing the entire bundle of uncooperative connections into something sensible, I had a successful installation. I was also able to splice in my usual treble bleed.
This is the result:


I'll report back after I tweak the internals to my liking and test on a couple jobs. The unit offers up to 25db of onboard boost, and has onboard boost or cut bass and treble controls that are zeroed at 12 o'clock and it's true bypass, not battery dependent with the boost circuit disengaged which is a nice peace of mind. I am optimistic.


