• Ernie Ball
  • MusicMan
  • Sterling by MusicMan

Alensezz

New member
Joined
Nov 24, 2024
Messages
2
Location
Minneapolis MN
Ok, long story short, i am NOT a luthier.

I own two EBMM majesties. Both have been beaten up profusely in the years ive owned them. Im very sure that the reason these cracks are on them is both several falls theyve taken, and a old and terrible way i stretched strings back when i originally got these.

Pics are of my 6 string as it is the most severe

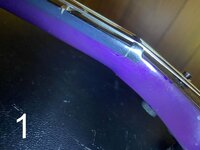
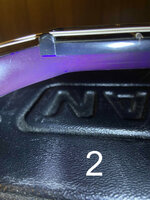
Pic 1 And 2 are side cracks by the nut, and this is identical to what my 7 string also has. These im fairly confident i can repair on my own, i just need to know the materials needed as theres videos of people repairing this very thing on the same guitar online

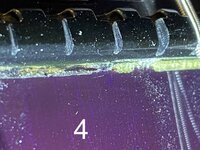
The thing that is worrying me is in pics 3 & 4. I have no idea on how to approach that, and cannot find anything like it online. I can guess what is going on exactly there, but i dont know for sure and would rather run it by more knowledgeable people. This is only happening on my 6 string as my 7 string looks normal behind the nut without breaking.

So what im seeking is advice. For pics 1 and 2, what would be the process and materials id need to repair the small hairline cracks

For the situation with pics 3 and 4, i want to know whats going on. If its something i should even attempt, and if i should, whats the process and materials i need to do that. Or if i should just send it to a professional luthier. 1.jpg 2.jpg 3.jpg
4.jpg
Thank you in advance.
 

nervous

Well-known member
Joined
Nov 9, 2014
Messages
356
Location
Central NY
Also no expert but with no shortage of opinions.

Pics 1 and 2: Based on the way they radiate out from the corners of the nut slot may not be anything deeper than finish cracking brought on by an impact, flexing it enough to shock the paint but not damage the wood. If you gently press and flex the headstock do those open at all? If not it's probably all still stable. The finish can be stabilizes with some thin CA glue wicked in, excess scraped and lightly wet sanded and polished. May not be beautiful but it shouldn't chip out compounding your issue.

Pics 3 and 4: These are interesting. Again it looks like finish chipping and loss along the nut margin and nothing more sinister. Perhaps a past fall struck the nut and again shocked that area of finish, cracking an loosening it. If that is stable you can try to color match and drop fill that area with some nail polish or model paint and that can be tricky business.It all depends on how pretty the repair needs to be.Done tight the nut should probably come out for both. Or simply apply some closest color Sharpie and move on.
 

PeteDuBaldo

Well-known member
Joined
Jul 16, 2004
Messages
10,186
Location
Central Connecticut (Manchester) USA
One thing to keep in mind with the location of these hairline cracks is that there are 3 different types of materials (neck wood, fretboard, nut) that are all covered by a thick poly clearcoat. These 3 different materials will expand and contract at different rates, as will the clear.

Also mentioned above is that a sharp impact could be the initial cause.

Just things to think about and consider on a Sunday afternoon.
 

Alensezz

New member
Joined
Nov 24, 2024
Messages
2
Location
Minneapolis MN
Also no expert but with no shortage of opinions.

Pics 1 and 2: Based on the way they radiate out from the corners of the nut slot may not be anything deeper than finish cracking brought on by an impact, flexing it enough to shock the paint but not damage the wood. If you gently press and flex the headstock do those open at all? If not it's probably all still stable. The finish can be stabilizes with some thin CA glue wicked in, excess scraped and lightly wet sanded and polished. May not be beautiful but it shouldn't chip out compounding your issue.

Pics 3 and 4: These are interesting. Again it looks like finish chipping and loss along the nut margin and nothing more sinister. Perhaps a past fall struck the nut and again shocked that area of finish, cracking an loosening it. If that is stable you can try to color match and drop fill that area with some nail polish or model paint and that can be tricky business.It all depends on how pretty the repair needs to be.Done tight the nut should probably come out for both. Or simply apply some closest color Sharpie and move on.
thank you! Im not so worried about the cosmetics, im only worried about the structural stability so if all seems well to you im less worried.

I did lower string tension on both and try flexing the cracks but culd not notice anything so i feels safe

with pics 3&4, i forgot to mention that it seems the clearcoat on top is unaffected. I dont know ifthat tells you more or not but i thought id mention it now that its on my mind
 

Gladwin

New member
Joined
Dec 1, 2024
Messages
2
Location
New York, America
For the cracks near the nut (pics 1 & 2), use thin CA glue to fill and stabilize the cracks. Apply the glue carefully, let it seep into the cracks, and then clamp the area lightly while it cures. Afterward, sand it gently with fine-grit sandpaper and polish to restore the finish. For the damage in pics 3 & 4, it looks more structural and might involve stress on the neck or deeper layers. This is better handled by a professional luthier to ensure it’s properly reinforced and repaired without risking further issues.
 
Top Bottom