DrKev
Moderator
Hi all! Long COVID brought my life to a grinding halt in February, and I'm still unable to do anything. Can't work, can't bring my kid to school, if I shower and shave the same morning I could be in bed for the afternoon. Which means if I do have some energy it's spent down internet guitar rabbit holes and tinkering with my guitars. It seems writing a long thread is possible today so please allow me to indulge myself. 
As a "holy crap I'm fed up" summer present to myself, I got some "vintage correct" single coils from Tone Hatch pickups. As I was getting bored of the mint green pickguard and pickup covers and knobs on my Cutlass, I decided to refresh the look along with the pickups. I had been thinking of a new pickguard but I really liked the look of a few vintage strats I've seen online where the pickup covers and knobs stayed a clean white against the mint green guards. The Fender "pure vintage 50's" knobs and covers kit (eggshell white, they call it) would contrast nicely with the mint green guard. I'd never find a matching white humbucker cover but maybe I could add a brushed nickel cover to the humbucker (because I saw a picture of that once and it looked awesome).
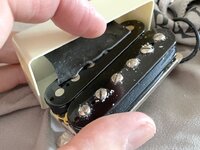
Getting the stock cover off the Cutlass humbucker took some time. It's only held on with double-sided tape on the top of the slug coil, but it's tenacious, stretchy rubber tape! After 15 minutes of pulling and tugging and pushing and careful levering, it came off just fine. If you ever do this yourself, expect some little pieces of potting wax to come out so cover the guitar or work surface to avoid smearing the wax where you don't want it. It cleans off very easily, but you can save yourself the trouble.
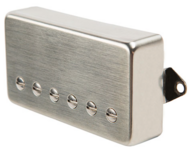
For those interested in changing your own Cutlass humbucker cover, the pole spacing is 53 mm so go for a cover closer to that rather than 52 mm. The new cover is held in place with a layer of masking tape on the slug coil followed by standard double sided tape. Then just put the new cover on and press into place. Usually metal covers should be soldered to the base plate to electrically ground them but I found that copper shielding tape did the same job with perfect electrical continuity from cover to ground. If the tape fails and the covers comes loose, it's easy to redo and solder.
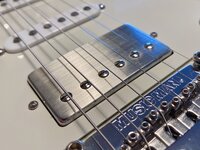
Turns out it's next to impossible to buy a single brushed nickel humbucker cover without ordering an actual humbucker. But I'm perfectly happy with the excellent stock humbucker so I figured I'd try to DIY a cover myself rather than spend more money. Didn't work out too well, I won't lie. I didn't quite get the brushed effect I wanted and in places went through the thin nickel coating to the copper layer underneath. But it has an interesting kinda relic vibe. Besides, humbucker covers are cheap so I'll make a few more tries. It's not like I'm doing a lot else right now.
So, ladies and gentlemen, I present to you, "Julia" before...
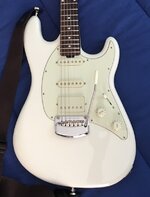
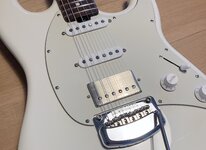
...and Julia, AFTER...
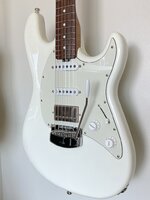
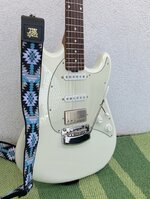
The cover has no obvious effect to the tone of the humbucker. I'm told that this is because the cover is made of nickel/nickel silver/german silver (different names for the same thing). But if the cover is made of brass, there is a loss of high frequencies. That may or may not be your cup of tea, so buyer beware.
The new Tone Hatch single coils are absolutely fantastic (and they were only $29.99 each)! These are the "Vintage Class" model, made to late '50s/early 60s Fender strat specs - fibre bobbins, "hand wound" 42 gauge formvar wire, AlNiCo 5 magnets. Of course, the stock Cutlass single coils are equally absolutely fantastic! In fact they are very similar. EBMM really did make a truly excellent modern recreation of the classic tones, perhaps just a hair more sparkle where these vintage recreations have a touch more upper mid spank. In truth I've gained very little from the new pickups other than the psychological placebo effect of having paid for "vintage correct" single coils.
But that's OK. I'm happy. I'll take every smile I can get right now.
Click here for the second attempt at the humbucker cover-> Post #16
As a "holy crap I'm fed up" summer present to myself, I got some "vintage correct" single coils from Tone Hatch pickups. As I was getting bored of the mint green pickguard and pickup covers and knobs on my Cutlass, I decided to refresh the look along with the pickups. I had been thinking of a new pickguard but I really liked the look of a few vintage strats I've seen online where the pickup covers and knobs stayed a clean white against the mint green guards. The Fender "pure vintage 50's" knobs and covers kit (eggshell white, they call it) would contrast nicely with the mint green guard. I'd never find a matching white humbucker cover but maybe I could add a brushed nickel cover to the humbucker (because I saw a picture of that once and it looked awesome).

Getting the stock cover off the Cutlass humbucker took some time. It's only held on with double-sided tape on the top of the slug coil, but it's tenacious, stretchy rubber tape! After 15 minutes of pulling and tugging and pushing and careful levering, it came off just fine. If you ever do this yourself, expect some little pieces of potting wax to come out so cover the guitar or work surface to avoid smearing the wax where you don't want it. It cleans off very easily, but you can save yourself the trouble.
For those interested in changing your own Cutlass humbucker cover, the pole spacing is 53 mm so go for a cover closer to that rather than 52 mm. The new cover is held in place with a layer of masking tape on the slug coil followed by standard double sided tape. Then just put the new cover on and press into place. Usually metal covers should be soldered to the base plate to electrically ground them but I found that copper shielding tape did the same job with perfect electrical continuity from cover to ground. If the tape fails and the covers comes loose, it's easy to redo and solder.
Turns out it's next to impossible to buy a single brushed nickel humbucker cover without ordering an actual humbucker. But I'm perfectly happy with the excellent stock humbucker so I figured I'd try to DIY a cover myself rather than spend more money. Didn't work out too well, I won't lie. I didn't quite get the brushed effect I wanted and in places went through the thin nickel coating to the copper layer underneath. But it has an interesting kinda relic vibe. Besides, humbucker covers are cheap so I'll make a few more tries. It's not like I'm doing a lot else right now.
So, ladies and gentlemen, I present to you, "Julia" before...

...and Julia, AFTER...


The cover has no obvious effect to the tone of the humbucker. I'm told that this is because the cover is made of nickel/nickel silver/german silver (different names for the same thing). But if the cover is made of brass, there is a loss of high frequencies. That may or may not be your cup of tea, so buyer beware.
The new Tone Hatch single coils are absolutely fantastic (and they were only $29.99 each)! These are the "Vintage Class" model, made to late '50s/early 60s Fender strat specs - fibre bobbins, "hand wound" 42 gauge formvar wire, AlNiCo 5 magnets. Of course, the stock Cutlass single coils are equally absolutely fantastic! In fact they are very similar. EBMM really did make a truly excellent modern recreation of the classic tones, perhaps just a hair more sparkle where these vintage recreations have a touch more upper mid spank. In truth I've gained very little from the new pickups other than the psychological placebo effect of having paid for "vintage correct" single coils.
But that's OK. I'm happy. I'll take every smile I can get right now.
Click here for the second attempt at the humbucker cover-> Post #16
Last edited:


