• Ernie Ball
  • MusicMan
  • Sterling by MusicMan

Spudmurphy

Well-known member
Joined
Aug 23, 2005
Messages
12,037
Location
Cardiff, United Kingdom
^
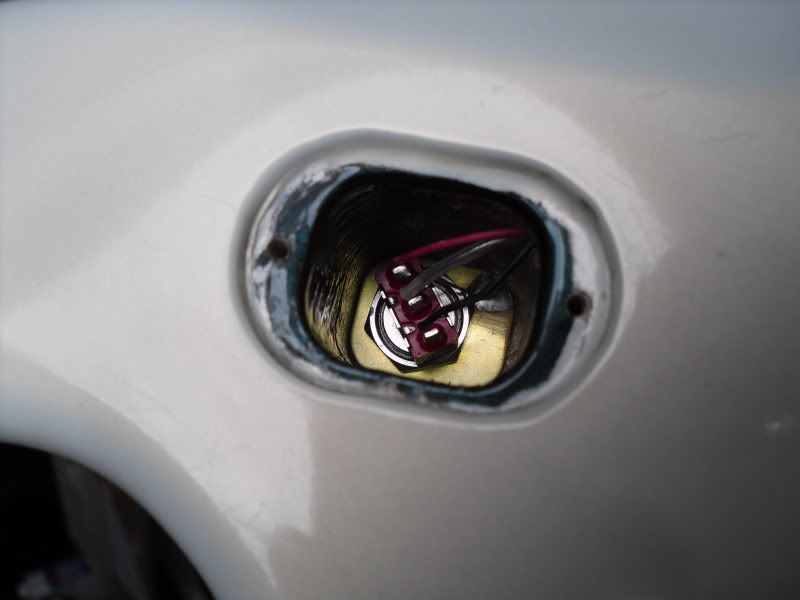
yeah "sinkage" is prevalent when you use say a wooden dowel to fill in any holes.
it can look as flat as a pancake then after you have sprayed with celly the damn thing will sink.
 

Morbid

Well-known member
Joined
Jul 27, 2005
Messages
133
Location
Daytona Beach, FL
See, this is exactly why I started posting on this forum, lol.

Alright, then I'm definitely gonna need your help with what I should do.
I actually DID/do intend on filling the necessary holes with wooden dowels (just seemed like the best way), but now I'm unsure.
I intend on having the guitar painted by someone else, as the paintjob idea I have is a little too complex for me (I'm not exactly a talented painter, lol).
The hole filling and body work is going to be unavoidable no matter what I do.
I assume even if I prime the guitar, paint it and THEN add the celly it will still sink? And what about the protective layer that normally goes on most basswood guitars before the painting is done?
I'm lost, haha.

What should I do?
 

Spudmurphy

Well-known member
Joined
Aug 23, 2005
Messages
12,037
Location
Cardiff, United Kingdom
Use a wooden dowel to fill the hole. Make sure that the wood does not have too much moisture in it - bring the dowelling indoors for a while to dry out. My mate uses a stopper coat and a filler primer coat.

I tell ya what - I'll be seeing my Luthier friend in the week and I'll ask him for ya.
He refinishes all his guitars in celly. - I'll see if I can get a picture of the Jaguar too!
 

the24thfret

Well-known member
Joined
Jan 4, 2007
Messages
2,458
This is a great thread, thanks for writing it all! It must add to your workload (guitar work + updating thread) but it's really interesting, so keep it up!
 

Morbid

Well-known member
Joined
Jul 27, 2005
Messages
133
Location
Daytona Beach, FL
Thanks guys!

Spud, I spoke to a friend of mine who does guitar bodies rather often. He also recommended the wooden dowel, but recommended a glue called Tite Bond to glue it in, and PC Woody to cover over it. He mentioned that I was correct, that the bondo wouldn't shrink or expand, but the guitar body WOULD. He had gone through that issue once before apparently. It'll be interesting to see if your luthier agrees or not.


On a different note...anyone care to somewhat disassemble their Ernie Ball JP and take pictures for me? LMAO.

I'm wondering if the piezo switch compartment has a copper plate like the other compartment does. I'd also like to see the volume and tone pots, to see if anyone else has my size comparison problem.
I've also got some extra washers and bolts, most of which I don't seem to need, as I've already got pieces that fit the sizes they are.

If anyone is actually interested in disassembling their JP, just take a whole bunch of pictures for me, haha. I would really appreciate it, but won't blame any of you who don't care to do that. :)
 

Spudmurphy

Well-known member
Joined
Aug 23, 2005
Messages
12,037
Location
Cardiff, United Kingdom
Tite bond is definitely the glue to use - that's one my mate uses.

I'll see him prolly tomorrow on my day off.

Yes the piezo switch has a plate which means that the switch only fits the compartment in one way.

SDC10281.jpg

P2110121.jpg

SDC10279.jpg

SDC10278.jpg
 
Last edited:

Morbid

Well-known member
Joined
Jul 27, 2005
Messages
133
Location
Daytona Beach, FL
Spud to the rescue!

It would appear that I do indeed have the copper plate. Your piezo pot also matches mine, but the other two are different. I must say, looking at your pictures, I'm dreading the wiring process now, lol.

It looks like I'm gonna have to skip day 4 of the stripping process. It rained all night last night, and it's a bit overcast today. While I could start stripping the guitar some more, I'm afraid to get caught in the middle of a rain storm since I'm doing this outside. Who knows, perhaps I'll feel ballsy and I'll start again. If not, it may have to wait a few days, as my work schedule starts again tomorrow, lol.
I'll keep you guys up to date either way.
 

Spudmurphy

Well-known member
Joined
Aug 23, 2005
Messages
12,037
Location
Cardiff, United Kingdom
Just got back from the workshop.
Here is some info that you may find useful?
1) Use basswood for the dowel and cut the dowel so it is NOT on the end grain (cut it the other way).
2)Use superglue (!!!!) to stick the dowel in and give it a good coating around the top part of the dowel - the part that will become flush with the body. Wet the hole with water and use the superglue on the dry dowel. He finds that the superglue dries back hard like a polymer and will not be so susceptible to shrinkage.
3) He uses a filler primer before the top coat and he uses a "mid weight" filler primer. Apparently they come in different "thicknesses"
I took some photos around his workshop that I'll host on photobucket - will try and put them up tonight.

Regarding the sinkage you have around the piezo he recommends using a cabinet scraper - just a flat piece of metal. Grind a good flat edge on the blade using a diamond stone then drag a chrome vanadium round bar across the edge - this will give it a "c shape" micro profile that does the scrapping. You would need to be careful to blend the area into the merging profile around the switch area. -other wise you will need to use some bondo to raise the whole area.
He only resorts to bondo as the last resort. Whenever he repairs basket case guitars e.g. old Gibson SG's - he always scarfs mahogany into the repair area using tite bond as the main glue but uses superglue around the jointing surfaces that are flush - once again drying hard like a polymer.

The Fender Jaguar/ jazzmaster ?? he worked on had been butchered so badly his only resort was to use some bondo - I have some photos of that which I will host (as previously mentioned) later on.

Hope this helps?
 
Last edited:

Morbid

Well-known member
Joined
Jul 27, 2005
Messages
133
Location
Daytona Beach, FL
Spud; I'm afraid there are a couple of things I'm not 100% clear on. I'm not really clear on any of the cabinet scraper part, but it's ok because I think I've got that part covered anyway. I'm already gonna have to use some kind of putty or bondo to raise some of the are anyway, just because there was such a poor job done of it before. Not my fault as it turns out.
I take it you mean I should wet the hole in the guitar body, put the super glue on the dowel, then place the dowel in? Give it time to dry, cut off the excess, add a thin layer of glue on top and then sand? I was really thinking Tite Bond sounded like the way to go. I'm surprised to hear Super Glue as a recommendation. I suppose I'll have to feel that one out a bit. Worst case scenario, I have to start all over. God I hope that doesn't happen, this has been a nightmare already! haha.
I'm looking real forward to seeing the pictures though!

Onto an update while I'm waiting for some stripper to settle. Sadly, I got conned into working today, so I'm not gonna be able to get much done on the guitar :(

I brushed the guitar off real quick to get some pictures before setting one more layer of chemicals on each side, just to get the little excess off.
Stripping09_tn.jpg

I'm really praying this will be the last stripping day I have...my back is killing me.

But the sides of the guitar are being extremely stubborn...
Sides_tn.jpg

Looks like me and sandpaper will be doing some 'bonding' time.

The back needs some more work still.
Stripping10_tn.jpg

Hey, wait...do you see that??

Piezocavity01_tn.jpg

Look what I found!! The chemical stripper has indeed been softening up the putty enough for me to dig it out little by little. Looks like my rerouting problem won't be such a big problem!
But if you look at the picture, you can see the person who did the job managed to booger up the edges. They're beveled in, where they SHOULD be flat. Looks like I'll be using some putty to build that area back up and flatten it out again.

Just because I'm OCD, I'll probably put some putty in this area too...looks like I made a booboo, though I'm not sure how :(
Booboo.jpg


Time for another layer of chemicals.
Stripping11_tn.jpg


Here's the front of the piezo cavity.
Stripping12_tn.jpg


I've already got the front scraped down as good as it can get. The rest is going to boil down to my orbital sander and some acetone.

Here's the back which is currently setting.
Stripping13_tn.jpg


I put a nice big glob in the piezo cavity to help me out a bit. It almost looks like modern art!
Piezocavityglob_tn.jpg


Time to strip some more, dig that cavity out, and then I've gotta head to work. Too bad I won't be home until it's too dark to do any more REAL work :(
 

the24thfret

Well-known member
Joined
Jan 4, 2007
Messages
2,458
Wow, err, uhm, beautiful? Haha. Good luck on the continued work. I can do a bit of disassemblage or pictures on my JP6 if you need so just PM me if you need.
 

Spudmurphy

Well-known member
Joined
Aug 23, 2005
Messages
12,037
Location
Cardiff, United Kingdom
Hey Morbid - good job!!

Yeah reading back on what I posted about the cabinet scraper - it's not too clear is it!

I was surprised when he said about the super glue - I notice that Dan Erlewine uses it a lot too.
Yeah - he said to dampen the hole and apply the superglue to the dry dowel. (personally I'd prefer tite bond with a dab of super glue around the join to stop shrinkage) - see what your mate says?

Looking good!!!

Edit
Regarding the piezo switch cavity that's bubbling away nicely - consider drilling a few small pilot holes through the gloop and let the stripper really go to town?
 
Last edited:

the24thfret

Well-known member
Joined
Jan 4, 2007
Messages
2,458
Edit
Regarding the piezo switch cavity that's bubbling away nicely - consider drilling a few small pilot holes through the gloop and let the stripper really go to town?

Isn't it usually the opposite -- that one would go to town for strippers? :D
 
Top Bottom